-
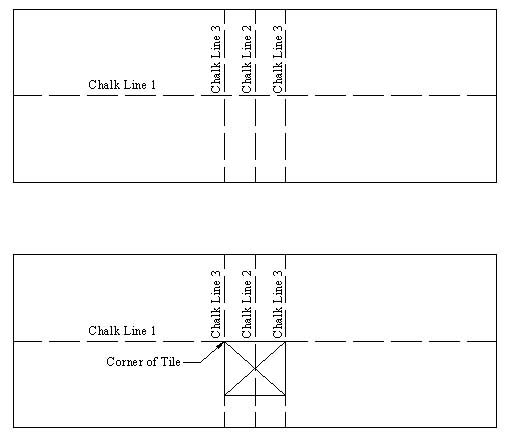
Please note from the two diagrams above where the first tile will be placed in accordance with the room.
-
Once the chalk lines are in place, the installer is now ready to begin the installation of the ceiling tiles. Please note that if the space is not perfectly square, the chalk lines may need to be adjusted to run as close to the parallel angle of the walls as possible.
-
The client will need to have all of the tools needed for the installation of the ceiling tiles ready. These tools include a staple gun with ¾” staples, the adhesive supplied by the manufacturer (Liquid Nails – AC-138 Formula) and a caulk gun.
-
Place several tiles face down to begin. Labels appear only on the backside of the ceiling panels. During the installation of the panels, be sure all labels are pointing in the same direction for consistency.
-
Apply a light ¼” wide flat film of adhesive, ½” inside the perimeter of the ceiling tile. Second, apply another light ¼” wide flat film of adhesive in the center area of the tile along the high relief areas of the tile. The high relief areas are places where the installer believes that the tile will touch the ceiling. DO NOT place a large daub of cartridge adhesive anywhere on the tile – this will show through the ceiling tile. Any excess adhesive can be removed immediately with warm water or mineral spirits.
-
Place the first ceiling tile indicated by the previous diagram. Firmly hold the ceiling tile in place along the ceiling making sure that the adhesive receives good contact with the surface for proper adhesion. Firmly hold for a few minutes.
-
The next step is to begin the stapling process of installation. All staples must be applied within a ¼” of the outer edge of the ceiling panel in order to be covered by the decorative strip, which will be centered over the butt joint. The manufacturer recommends three staples along each side of the ceiling tile, which include one staple in each corner of the tile.
-
Once the first ceiling tile is installed, the installer can then begin placing the other field tiles. The second tile to be installed should be butt jointed to the first tile. Please note the direction of the layout for the field tiles in accordance with the layout designed for this particular space. Repeat steps 7 through 9 for each ceiling tile. When all of the field tiles have been installed, then continue with step 11.
-
The installer is now ready to begin installation of the decorative moulding. Please note that moulding should be installed prior to the installation of the filler tiles. Filler tiles are the ceiling panels that run along the perimeter of the space to fill in the ceiling area between the wall and the field tiles.
-
The first step with the installation of the moulding is to place the corner moulding pieces. Examine the corner pieces for proper positioning within the corner of the space. Apply a light ¼” wide flat film of adhesive within 3/8” inside the edges of the corner pieces. Place the corner piece in the proper position and firmly hold in place for a few minutes to allow for proper adhesion. Next, locate two staples along each top edge of the corner piece. (The top edge is the lip that contacts the ceiling) Be sure that all staples are applied within a ¼” of the outer top edge of the corner piece.
-
Repeat step 12 for all other corner moulding pieces.
-
The next step is to install the cornice moulding pieces. Please refer to the
installation guide sheet
found on the website for diagrams displaying how cornice moulding pieces should fit onto the shoulder of the corner piece.
-
First, examine the cornice moulding for proper positioning along the wall and ceiling. The first piece of cornice moulding should fit onto the shoulder of a corner piece. Determining which corner piece to begin with can be left up to the discretion of the installer. Apply a light ¼” wide flat film of adhesive within 3/8” inside the top and bottom edge of the cornice moulding. Place the cornice moulding in the proper position, shouldering onto the corner moulding piece and firmly hold in place for a few minutes to allow for proper adhesion. (Note: only one end of the cornice moulding will shoulder onto the corner piece). Next, locate a few staples along the top edge of the cornice moulding. Be sure that all staples are applied within a ¼” of the outer edge of the cornice moulding piece.
-
The continuation of the cornice moulding pieces is fairly simple. Where one section of cornice moulding meets another section, the edge should be overlapped enough for the continuation of the pattern. Repeat step 15 for proper installation with adhesive and staples of these cornice moulding pieces. (Note: If the overlapped area of the two cornice moulding pieces has to large of a gap for the client’s approval, the installer can apply a paintable, white caulk in the gap for a seamless appearance.)
-
When applying the cornice moulding from one corner piece to another corner piece, repeat steps 15 & 16 for proper installation. When the last section of cornice moulding for one wall is trimmed and fitted into the corner piece, begin the next run of cornice moulding using the last cornice moulding piece that was trimmed away. This insures a uniform pattern around the room. (Please reference the Installation Guide Sheet on the website for a diagram of this process.) Trimming of the tiles and moulding can be done with a sharp utility knife or scissors. When using the utility knife, simply score the trim line surface and bend the trimmed edge down at a right angle and it will snap off. If the installer notices a jagged edge on the tile, use the
utility knife or sharp blade to gently scrap the trimmed edge for a smoother appearance.
-
Once all of the corner moulding pieces and cornice moulding is installed, the next step in the process is the installation of the filler tile panels. Filler panels should be installed one wall length at a time. First, measure the distance from the edge of the field tile to the first 90-degree angle of the cornice moulding. (The tape measure should overlap the top edge of the cornice moulding, but does not overlap the edge of the field ceiling tile). To place this in another perspective, the filler tile will be trimmed to fit the measured distance from the field ceiling tile to the cornice moulding. The 24” edge of the filler tile will form a butt joint with the 24” edge of the field ceiling tile. The cut edge of the filler tile will then overlap the top edge of the cornice moulding. (Note: There will be no decorative strip necessary to cover the seam of the filler tile to the cornice moulding.) Be sure to measure the distance in several places to ensure accuracy in measurement for all filler tile panels within one wall length.
-
Once the measurement for the correct width of the filler tile panels is calculated, begin trimming the filler tile panels. When trimming the filler tiles, lay the tile with the flat side facing upward. To cut a panel lay a straight edge of at least 24” in length on the trim line and follow the instructions for trimming in step 17.
-
When all of the filler tile panels have been trimmed for one wall length, installation of the tiles can begin. Repeat steps 6 through 9 for installation methods. (Note: The 24” edge of the filler tile will form a butt joint with the 24” edge of the field ceiling tile.) Continue with the remaining filler tiles for the one wall length distance.
-
Repeat steps 18 through 20 for the remaining filler tile panels.
-
The last step in the installation process of this product is the installation of the decorative strips. The decorative strips cover the butt joints or seams of the field and filler ceiling tiles. Decorative strips have a protective peel surface that can easily be peeled from the adhesive backing. DO NOT touch the adhesive backing. If the adhesive backing comes in contact with dust, oil or grease of any kind, it will not adhere to the ceiling tile edge surface. If the strip is installed and has to be reinstalled for any reason, the adhesive backing on the decorative strip will not adhere. If the decorative strip does not adhere for any of the above reasons, simply use a
small amount of the Liquid Nails AC-138 Adhesive for installation. First, install all decorative strips that run in one direction. The first decorative strip must be positioned with the dot on the end of the decorative strip located directly over the intersection of the butt joint of a panel. Each strip running in the same direction will be butt jointed to the end of the previous decorative strip. If the strip needs to be trimmed when meeting a wall, simply cut the end of the strip appropriately.
-
After all the decorative strips have been installed in one direction, then begin installing the remaining strips perpendicular to the previous ones. Approximately one inch of the strip material that contains the dot part of the decorative strip will need to be trimmed off. Once the strip is trimmed, the remaining strips can be installed following the installation methods in step 22.
-
Once all decorative strips are in place, the installation process is complete.