INSTALLING CEILINGS MAGNIFIQUE CEILING TILES
Application Guidelines and Installation Instructions
GRID MOUNT INSTALLATION
Ceilings Magnifique reproduction ceiling tiles may be suspended by means of an approved ceiling suspension system using a standard 1" face t-bar grid, per the grid manufacturer's instructions. Check building codes as required.
Tiles measure 23.75” X 23.75” and are installed by simply laying them in place within the suspension grid desired.
In perimeter situations where T-bar sections are irregular or not a full 24" X 24" our edge trim / filler tiles can be easily trimmed to fit as needed using common household scissors.
Decorative Grid Strip Installation
The decorative strips are 24” long and cover a standard 1” suspended ceiling grid. Decorative strips have a protective peel surface that can be easily peeled from the adhesive backing. Do not touch the adhesive backing, as if it comes in contact of dust, oil or grease of any kind it will not adhere to the ceiling grid. If the decorative strip does not adhere for any reason, a small amount of caulk adhesive can be applied.
First install all the decorative strips that run in one direction. Each strip pattern begins with a dot and ends with a dash. The dot should be place and centerd directly over the four-way grid intersection. Butt the next decorative strip directly against the first, creating a repeating pattern. Always “dry fit” first before pealing the masking to expose the adhesive. If a strip needs to be trimmed, simply cut the end of the strip appropriately.
After all of the decorative strips running in one direction have been installed, begin installing the strips perpendicular to the first set, trimming as necessary. Always “dry fit” first before pealing the masking to expose the adhesive. Approximately 1” of each perpendicular strip will need to be trimmed off.
Once all decorative strips are in place, the installation process is complete.
Back to top
DIRECT MOUNT INSTALLATION
Ceilings Magnifique ceiling tiles can be installed directly onto your ceiling or wall using staples, nails, screws or adhesive. The installation method is determined by the surface to which your ceiling tiles will be secured.
Surface Types and Method of Installation
Gypsum Board
Ceiling tiles should be installed by applying adhesive to the center of the tile and then stapling them to the gypsum board ceiling with staples that are at least ½” long. A combination of adhesive and 3M Double Sided Mounting Tape may also be used if you do not wish to use staples (see Item 6 in “Ceiling Tile Installation” below).
Plywood
Ceiling tiles should be installed by applying adhesive to the center of the tile and then stapling or nailing them to the plywood ceiling. A combination of adhesive and 3M Double Sided Mounting Tape may also be used if you do not wish to use staples or finishing nails (see Item 6 in “Ceiling Tile Installation” below).
Wood Furring Strips
Ceiling tiles should be installed by stapling or nailing them directly to the wood furring strips. PLEASE NOTE: Wood furring strips need to be on 23 ¾” centers both directions.
Existing Fiberboard and Mineral Fiber Ceiling Tiles
We recommend removing the existing fiberboard or mineral fiber ceiling tiles and installing new sheet rock, plywood or furring strips to receive the new tiles. If, for some reason, you are unable to remove the existing fiberboard or mineral fiber ceiling tiles, the new tiles should be installed by applying adhesive to the center of the tile and then nailing them to the ceiling using nails long enough to penetrate through the fiber and into the wood beneath.
Drywall
Ceiling tiles should be installed by applying adhesive to the center of the tile and then screwing them to the drywall ceiling. A combination of adhesive and 3M Double Sided Mounting Tape may also be used if you do not wish to use screws (see Item 6 in “Ceiling Tile Installation” below).
Back to top
PREPARATION OF INSTALLATION SURFACE
The installation surface should be a smooth, solid surface that is clean, dry and free of oil and grease.
Drywall
For new construction, the ceiling drywall can be installed with the backside facing out in order to eliminate the edge indentation made from the seam tape. The ceiling tiles are then mounted directly onto the sheet rock. If the existing drywall has excessive damage or gaps, taping and bedding may be necessary.
“Popcorn” Ceilings
The rough finish should be scraped off of the ceiling, and the remaining drywall surface smoothed and cleaned. Visit The Natural Handyman or Ron Hazelton's House Calls for more information about removing popcorn ceilings. Alternatively, wood furring strips or another layer of drywall may be installed over the existing ceiling (it is not necessary to tape and float).
Back to top
TOOLS REQUIRED FOR INSTALLATION
- Tape Measure
- Pencil
- Chalk Line
- Scissors, Utility Knife, Lightweight Shears or Tin Snips
- Staples and Staple Gun, Finishing Nails and Hammer or Screws and Electric Screwdriver
- Adhesive – We recommend MAACO “Liquid Nails AC 138 All Purpose Adhesive Caulk”
- Caulking Gun or Saw Tooth Trowel (for Bulk Adhesive)
- 3M 1” Double Sided Mounting Tape (Optional)
Back to top
CEILING TILE LAYOUT
Begin the layout of the ceiling tiles by finding the center of the ceiling. Place a chalk line in the center of the ceiling from one wall to the opposite, parallel wall (Chalk Line 1). Next, find the wall perpendicular to the first wall and place a chalk line in the center of the ceiling from that wall to its opposite parallel wall (Chalk Line 2).
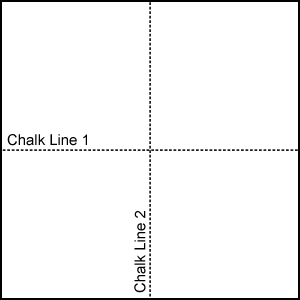
Fig. 1 - Place chalk lines to find the center of the ceiling.
-
Ceiling tiles should be installed starting from the center of the ceiling and working to the outside, so you’ll want your layout to reflect this. You may place the first ceiling tile at the intersection of Chalk Line 1 and Chalk Line 2 (Layout 1) or in the corner created by the intersection of Chalk Line 1 and Chalk Line 2 (Layout 2).
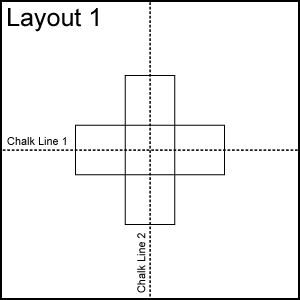
Fig. 2 - Ceiling tile layout with a center ceiling tile.
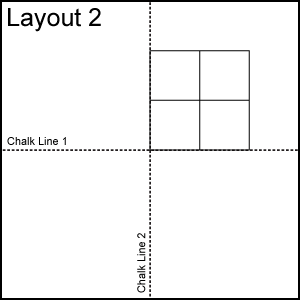
Fig. 3 - Ceiling tile layout with an intersection in the middle of the ceiling.
-
PLEASE NOTE: We recommend using edge trim ceiling tiles around the border of the ceiling when the border is too small to accommodate full tiles. Edge trim tiles are designed with a minimum pattern that lends itself to cutting and trimming.
-
Once the chalk lines are in place and you have chosen a layout, you are ready to begin the installation of the Ceilings Magnifique Ceiling Tiles. Please keep in mind that ceilings are often not perfectly square and chalk lines may need to be adjusted.
Back to top
CEILING TILE INSTALLATION
- Make sure that you have all the tools necessary for the installation of the ceiling tiles. For this installation guide, these tools include a staple gun, ¾” staples, a caulk gun, adhesive caulk and scissors.
- Apply a ¼” wide flat film of adhesive to the backside of the ceiling tile ½” inside the perimeter. Next, apply another ¼” wide flat film of adhesive in the center area of the tile along a high relief area. A “high relief area” is a point on the ceiling tile that will touch the ceiling once the tile is installed. DO NOT place a large daub of adhesive anywhere on the ceiling tile, as this will be visible through the tile. Any excess adhesive can be removed immediately with warm water or mineral spirits.
- Install the first ceiling tile according to one of the ceiling tile layouts mentioned previously. Firmly hold the tile in place, making sure that the adhesive makes good contact with the ceiling surface for proper adhesion.
- Along each side of the ceiling tile, apply three staples within ¼” of the tile’s outer edge. The close placement of the staples to the outer edge will ensure that they will be covered by the decorative strip, which will be centered over the butt joint between two tiles later on in the installation process.
- If you are not using staples, nails or screws to hold the ceiling tiles in place, you should apply four 1” x 1” pieces of 3M Double Sided Mounting Tape to the center of the tile in addition to the adhesive described previously. The tape will hold the ceiling tile in place while the adhesive sets and bonds.

Fig. 4 - Four 1" x 1" pieces of tape are applied to the center of the tile to hold it in place while the adhesive sets.
- Once the first ceiling tile is installed, begin placing the adjacent tiles. The second ceiling tile should be butt jointed to the first. Repeat Step 3-6 for each ceiling tile. When all of the center ceiling tiles have been installed, proceed to the next section.
Back to top
EDGE TRIM INSTALLATION
- Edge trim tiles are those ceiling tiles that have been designed with a minimum pattern that lends itself to cutting and trimming. These tiles are used around the perimeter of the room, between the center, inset tiles and the wall.
- To begin, measure the first non-corner edge trim tile location. Measure the distance from the edge of the inset tile to the wall. Cut the edge trim piece to size. When trimming edge trim with a utility knife, lay the ceiling tile with the backside facing upward. To cut the tile, lay a straight edge of at least 24” in length along the trim line, score the surface and bend the trimmed edge down at a 90 degree angle until the piece snaps off. If the trimmed edge is jagged in appearance, use the knife to gently scrape it smooth.
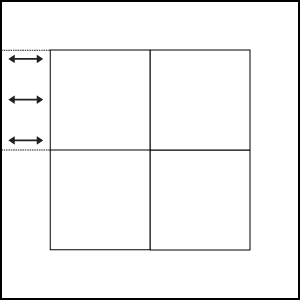
Fig. 5 - Measure from the wall to the edge of the inset ceiling tile.
- Apply a ¼” wide flat film of adhesive to the backside of the edge trim tile ½” inside the perimeter. Next, apply another ¼” wide flat film of adhesive in the center area of the tile. Firmly hold the tile in place, making sure that the adhesive makes good contact with the ceiling surface for proper adhesion. Along every side of the edge trim ceiling tile EXCEPT for the side that meets the wall, apply staples as needed within ¼” of the tile’s outer edge. Where the edge trim tile meets the wall, use adhesive only.
- Repeat Step 2-4 for the remaining edge trim tiles. Make sure to proceed from one ceiling tile to the next adjacent ceiling tile.
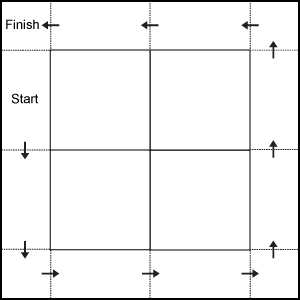
Fig. 7 - Begin with a non-corner tile and then proceed from edge trim tile to adjacent edge trim tile.
Back to top
DECORATIVE JOINT STRIP INSTALLATION
- The decorative joint strips for direct mount installations are 23 ¾” long for and cover the butt joints between ceiling tiles. Decorative strips have a protective peel surface that can be easily peeled from the adhesive backing. Do not touch the adhesive backing, as if it comes in contact of dust, oil or grease of any kind it will not adhere to the ceiling tile edge surface. If the decorative strip does not adhere for any reason, a small amount of caulk adhesive can be applied.
- First install all the decorative strips that run in one direction. Each strip pattern begins with a dot and ends with a dash. The dot should be place directly over the intersection of four ceiling tiles, fully covering that four-way intersection. Butt the next decorative strip directly against the first, creating a repeating pattern – the first dot on the second strip placed over the intersection of the next four ceiling tiles. . Always “dry fit” first before pealing the masking to expose the adhesive. If a strip needs to be trimmed, simply cut the end of the strip appropriately.
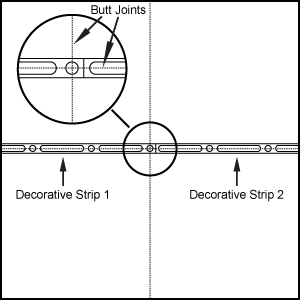
Fig. 8 - The dot on the strip should be placed over the four way intersection.
- After all of the decorative strips running in one direction have been installed, begin installing the strips perpendicular to the first set, trimming as necessary. Always “dry fit” first before pealing the masking to expose the adhesive Approximately 1” of each perpendicular strip will need to be trimmed off.
- Once all decorative strips are in place, the installation process is complete.
Back to top
PAINTING CEILINGS MAGNIFIQUE CEILING TILES AND DECORATIVE STRIPS
All Ceilings Magnifique products can be painted before or after installation. Be sure ceiling tiles, molding and decorative strips are clean and dry, and experiment on a sample ceiling tile with your paint of choice before painting the ceiling in its entirety. Do not use solvent type thinner or cleaners.
Back to top
CLEANING
Ceilings Magnifique Tiles by Ceilume require no special cleaning agents. Just wipe with a soft, damp rag. There is no risk of water damage during cleaning, and there is no need for scheduled professional cleaning and resurfacing to prevent environmental and aesthetic problems. Small, stubborn spots can be handled with cleaners such as Fantastik® or Windex®.
Cleaners containing organic solvents or other aggressive ingredients should not be used because they may affect the surface appearance of the tile. Examples of such cleaners are chlorine bleach, liquid grease remover, strong soaps and detergents containing organic solvents, nail polish remover and furniture polish/cleaners.
Back to top
STORAGE
Do not store in contact with direct sunlight or other heat source that might soften panels. The typical heat distortion temperature of rigid vinyl is approximately 150 degrees Fahrenheit. When temperatures reach these levels, the vinyl may distort.
Back to top


